# Automatic Pellet Feeding System
# What's in the box
| Item | Quantity |
|---|---|
| Pellet Feeding System Controller | 1 |
| Air venturi for ¾” hose | 1 |
| ¾” hose | 3.8m |
| 6mm Nylon hose | 2m |
| Worm clamp | 2 |
| Elbow PTC | 1 |
# What you need
- 24VDC Power Supply with a minimum of 2A
- An open-source compatible 3D Printer Controller (Optional. Enable the printer to pause when you are out of pellets).
- Marlin
- Repetier
- RepRap
- Compressed air supply
- An air compressor with a recommended pressure of 80 PSI (5.5 bar) and an airflow of 10.7 SCFM (18 m3/hr)
- Air filter 10 microns
- Oil removal Filter
- Pressure regulator
- Venturi inlet vacuum hose of 72”H2O or 18 kPa
- A NPN pellet sensor
- This type of sensor is provided by default with our Pulsar™ and Pulsar Atom™ extruders
WARNING
Our pellet feeding system includes a specially designed corrugated hose, optimized for vacuum operation. If you choose to replace this hose, ensure the replacement is rated for vacuum applications to maintain system performance.
Additionally, the hose serves to dissipate electrostatic charges. To use this feature properly, connect the embedded metal wire to the AC ground.
# Wiring

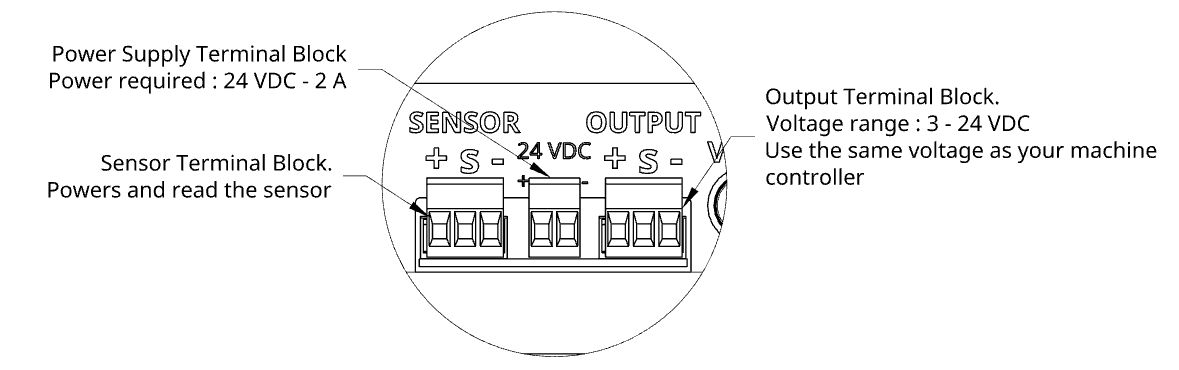
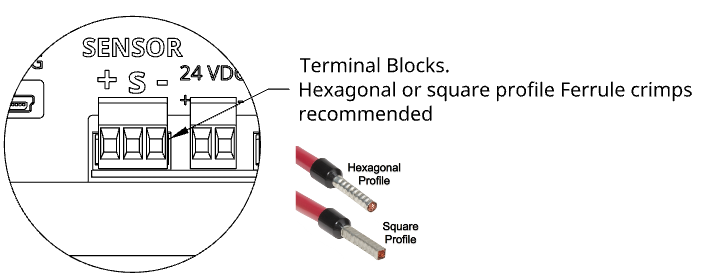
- We recommend using ferrule crimps for the wires of the sensors, power and the output.
- 24VDC : Connect a 24 DC power supply to the 2 pins terminal block. Positive lead on the left TB
- SENSOR : Connect the capacitive sensor (packed with your Pulsar™) to the 3 pins terminal block. The DC pins supply power to the sensor from the controller
- OUTPUT_+ : Connect to your control board logic voltage. Range : 3VDC - 24 VDC
- OUTPUT_- : Connect to your control board GND
- OUTPUT_S : Connect to one of your control board input
WARNING
Using the wrong voltage on OUTPUT_+ could cause damage to your control board. When the alarm is activated, the voltage on OUTPUT_S will be equal to OUTPUT_+. Control board logic voltage is not always the same things as the power input voltage. Please refer to the manufacturer specification for more details.

- VENTURI : Connect the Venturi Valve to the Pellet Feeding System Controller with Ø6.00 mm or 1/4" OD Hose
- COMP : Connect the Compressor to the Pellet Feeding System Controller with Ø6.00 mm or 1/4" OD Hose
# Venturi Installation
Check out our drawing page (opens new window) to get the 3D STEP file. Design your bracket according to the available mounting options
Follow the instructions below for a safe installation of the Pellet Feeding System.
- Position the venturi valve between hoses connecting the hopper/pellets container to the Pulsar Extruder
- Install ¼” NPT to 6 mm push-in fitting on the venturi vacuum
- Connect the 6 mm hose between the controller and vacuum
- Connect the capacitive sensor to the controller
- Connect the power to the controller
- Fill the Pulsar™ inlet with material
- Calibrate the sensor’s sensitivity (see calibration procedure)
- Connect the hoses to the Pulsar™
- Connect Air supply to the controller
# Good practices
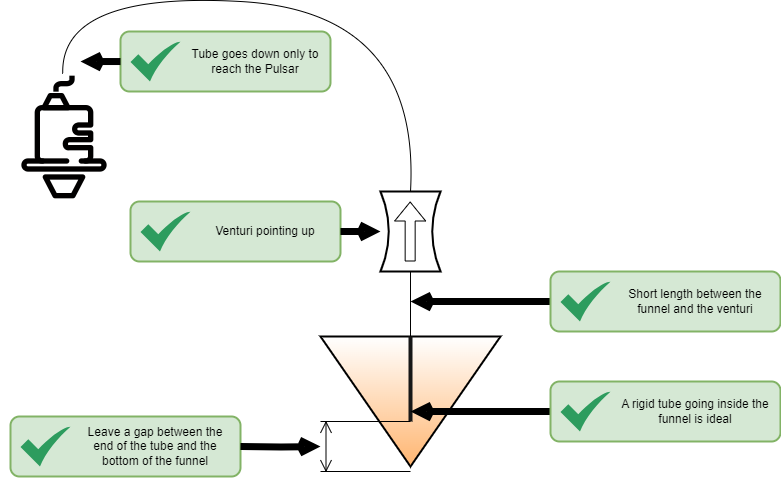
- Venturi Material Exhaust oriented upward
- Avoid sharp turns in the hose
- Material inlet hose oriented upward
- Material hopper/container converges into a funnel
- The hose transporting the pellets must have a limited length below the inlet of the bulk material
- Adjust the open time of the controller according to the length of the hose between the venturi and the pellet extruder.
WARNING
Avoid any of the details mentionned below!

# Sensor Calibration Procedure
Tools Needed :
- Small flat screwdriver
- Fill the Pulsar™ inlet with pellets
- Turn on the pellet feeding controller to power up the sensor
- Turn the screw on the sensor counterclockwise until the red LED turns off
- Turn the screw a quarter turn clockwise at a time until the red LED turns on
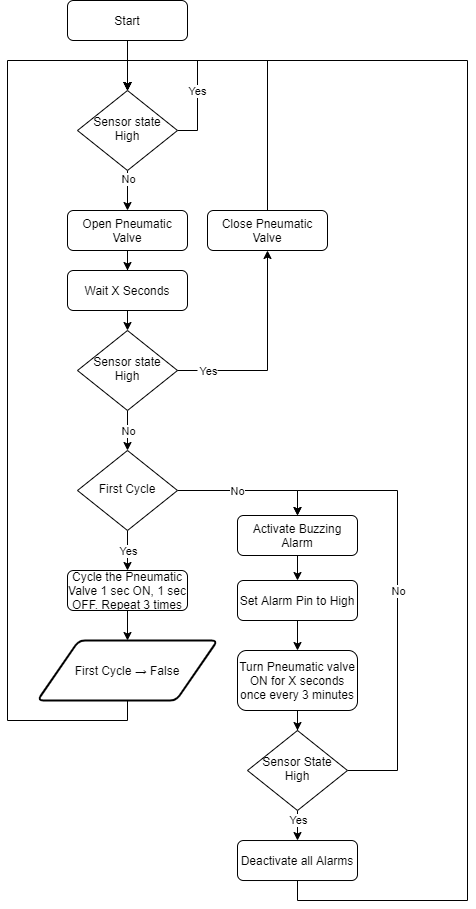
# Pellet Feeding Controller Logic & Configuration
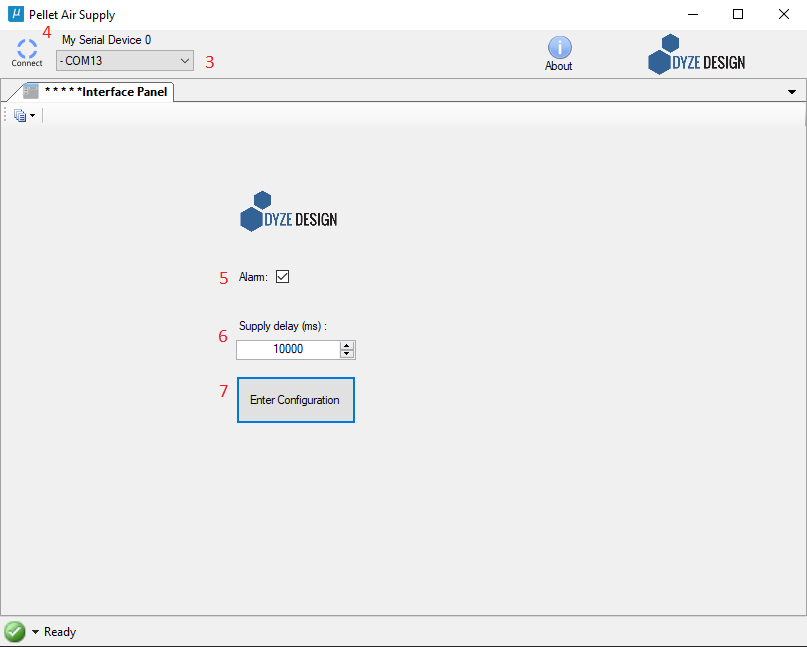
To configure the pellet feeding controller, download & install the venturi configuration tool: VenturyInterface_rev002.msi (opens new window)
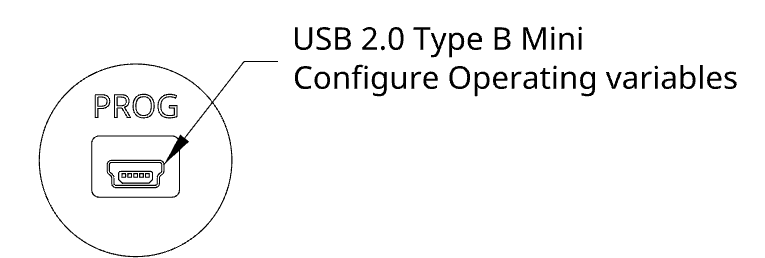
Plug a USB mini type B to the controller from your computer and launch the software. You can then configure the operating variables.
Select the COM port your device is connected to. See this page (opens new window) for further information on COM port and drivers
Click Connect
Check the alarm box to turn on the buzzer along the signal. Alarm signal will work regardless
Input the supply “stay on value” in milliseconds. Default is 10000 ms or 10 seconds
Click enter configuration
# Firmware
This section will show you how to enable a pause feature when the venturi controller detects that you are out of pellets and the alarm is raised.
# Marlin Firmware
You can use the filament runout feature.
See our doc: https://docs.dyzedesign.com/filament-sentinel.html#marlin-firmware
# Repetier Firmware
See our doc for filament runout feature: https://docs.dyzedesign.com/filament-sentinel.html#repetier-firmware
# Reprap firmware
https://docs.dyzedesign.com/filament-sentinel.html#reprap-firmware
# Troubleshooting
There’s a known issue with the firmware on the Pellet Feeding System shipped prior to January 2022.
Behavior : Solenoid valve stays on endlessly regardless of sensor’s state
Fix : Install updated firmware version
# Updating the PFS Controller's Firmware
Requirements :
- Latest Firmware (opens new window) (02-2022)
- Xloader software (opens new window)
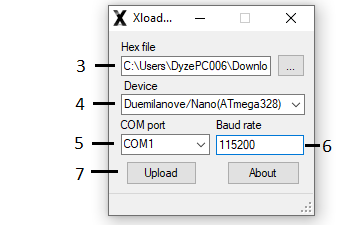
- Connect the arduino to your computer
- Launch Xloader
- Locate the firmware .hex file
- Select the device : Nano(ATmega328)
- Select the COM port your device is connected to. See this page (opens new window) for further information on COM port and drivers
- Set the Baud rate to 115200
- Upload